Drawing noses is easy - if you learn to look for the main landmarks and shapes hid within it
The first thing leading into any situation - especially if you're an animal - is the nose. First thing a fox, a wolf, a dog, an antelope, a cat etc. does on meeting is what? Get the old schnozola out there, right? They start sniffing this and sniffing that upon meeting. Freud had his ideas about the nose too but we won't eeeven go there. Snakes "smell" the air with their tongues and our organ of taste is intricately involved with our ability of to smell.
So the nose, evolutionarily speaking, has been our most social sense - or antisocial - depending on how you look at it. In these postmodern/ post-Neanderthal days sight has come to dominate our sensorium and smell has been demoted to a secondary or even a tertiary position in our sensory armamentum. That was a mouthful. Now we'll turn our venerable powers of vision to this fading but still trusty organ of olfaction.
Drawing the nose: approaching the anatomy
What do you need to look for when drawing the nose? Before we get into any actual anatomy of the nose, let's review how it fits into the face. Well, it starts there right between the eyes at the center of the forehead (this is the root of the nose), courses over the plane between the cheekbones and lands at it's base above the upper lip.
The main bone beneath the nose is the hemisphere-like structure of the maxilla (The maxilla houses the soft palate of the mouth, your nasal passages and your upper row of teeth. (You can see more detailed anatomy in any anatomy book [like Gray's Anatomy] or in the YouCanDraw.com e-book, which by the way goes to great extremes in detailing the anatomy as it applies to drawingfaces). Click on the button for Gray's Anatomy:
Note: If a new screen doesn't open on your computer monitor, click on the last Internet Explorer or Netscape mini-icon on the right at the very bottom of your computer screen. This should pop the new browser back up to the top. If that doesn't work, click on all of the browser icons one at a time along the bottom of your screen until you see the correct picture pop up. And you'll know which one that is. Go right down the row and click on these:
Diving in
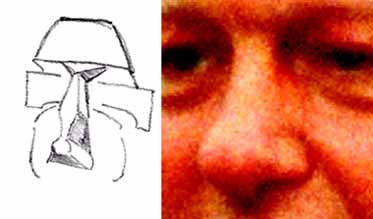
In any event, you can make out schematically the basic shapes and planes of the middle part of the face in this next picture:
Pointing out the root of the nose, (which arises from the
forehead), the cheekbones, and the maxilla. From these
you can get a sense of the span of the nose
Zeroing in on the actual nose
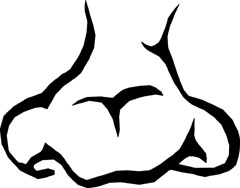
Here you can see the three main drawable shapes or wedges of the nose:
The nose can be conceptualized as three identifiable wedge shapes
1) The first wedge where it comes out of your forehead (the root of the nose) that's the "first wedge" - the upper most wedge in the picture above;
2) The middle wedge of the nose - that's the second wedge. It's actually closer to a slender diamond shape than anything else. At least that's how I think of it. This is the main bulk of the nose - most of the time. Looking at Mr. Dali Lama's nose you can see the tip of his nose is his dominant part. (At least in his caricature above and below.)
3) The bulbous tip is really the most complicated part of the nose because the tip of the nose, the nostrils, and the septum (the partition between the left and right halves of the nose) are all grouped together here.
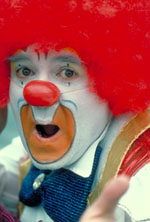
What do these two have in common (and don't say they're both in the same profession, that would be a cheap shot :-) Right! the bulbous noses...Sorry, I couldn't resist the
clown reference, I mean I did vote for him but I just got done watching Conan
O'Brien. It's Conan's fault, Plus this is a caricature site
Can you identify all three sections of each nose in this picture and the one above?
Go for it - I know you can. (Take an extra second to search out the top wedge, you
know, where the nose comes out of the forehead.) That leaves you to find the
middle and bottommost wedge (i.e. the bulbous tip).
Sniffing out more depth
At a more in-depth level anatomically speaking, there's different cartilages that make up the wedges. In fact if you put your finger on your nose and squish it up and wiggle it by putting pressure on it, you can feel the cartilages shifting and clicking around a little bit. Go for it, give it a try. Weird isn't it? But that's what you're feeling: cartilage. There's very little real bone in the nose - just a little sliver right up there at the root - the aptly named nasal bone (and you remember where the root is right? Right where it comes out of the forehead - you remembered! Grrreat.). The rest of your nose won't show up on an x-ray (only calcium at high densities will - like you have in bone)
Here's a side view of the nose where you can see the main cartilages, in fact, I'll even name them (but you sure don't have to memorize them to draw the nose. Knowing they're there will help you appreciate the shadows, the highlights, the different angles - that is, the landscape of the nose:
The lateral alar cartilages ( two of them)
The greater alar cartilages (two at the the tip)
the lesser alar cartilage (cartilage of the wings of the nostrils)
The nasal bone
More than any other feature of the face, the nose has subtle, not so subtle, and sometimes even striking angles and planes jigsawed into it. That's a result of all those cartilages and air spaces fitting together like a piece of complex carpentry. And that can make it tough sometimes to decide what exactly to draw. Again, having a feel for the general wedge shapes will be more than enough to get you started.
Now let's take a second to reconcile the wedges of the nose from the cartilages of the nose - as an academic exercise - and to make sure you see they're not always one and the same:
The cartilages of the nose and their
contributions to the different
"wedges" of the nose
What's most apparent is that the second wedge (the middle wedge), is often made of the both the lateral and the upper part of the greater alar cartilages. The bulbous tip of nose - the bottom most wedge is made of both the greater and lesser alar cartilages. (The tips of the greater alar cartilage form the actual tip of the nose and the lesser alar cartilage form the backbone of the nostrils. )
Some folks like actors Karl Malden or Owen Wilson have a very dominant bulbous "tip of the nose". Further, in both Wilson and Malden you can see marked division in the left and right halves of the nose...more to come on that to come in a second. (Wilson is Jackie Chan's partner in in the 2003 movie Shanghai Knights - go to Google.com and look up either Wilson or Malden in "images" .)
The Karl Malden, Owen Wilson "two-part tip-of-the-nose"
Just to confuse you more, all you've learned about the caritlages can be doubled. "Doubled!" you say. Yep, doubled. Doubled because the nose has left and right halves: mirror images. In some folks this is very obvious (again, like in Owen Wilson and Karl Malden).
The bulbous tip - the third wedge actually - is generally the most complicated part of the nose and can be broken into several subdivisions:
the very tip, (which is really two halves)
the left and right nostrils, and
the nasal septum - the little piece of tissue you can grab between the two nostrils (which also runs divides the entire nose in halves on the inside)
Note: Notice that groove in the very center of the tip of the nose. On some folks it's really obvious. On others, it's totally invisible. (You can see it's suggested in the nose on the right in the next picture below.) That's the outside proof that there's two halves to the nose. (And I know, you're not here to look for proof of this stuff, you just want to learn how to draw it. And that's why I bring up all this stuff about the tip of the nose and it's halves - so when you sit to draw it, you'll appreciate what's literally "under your nose". :-)
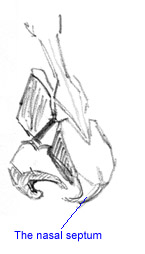
In this next illustration we're comparing the deeper anatomy of the nose between a side view of the nose (on the left) and it's three-quarter view:
Compare the different cartilages of the nose between the two views - notethe
subtle line running down the middle of the tip of the nose: that's the split
between the left and right halves; it's actually a type of joint (squish
your nose with your finger tip and you can feel it moving, eeww!)
The arrow or claw shaped section
at the bottom middle of the tip is
the nasal septum
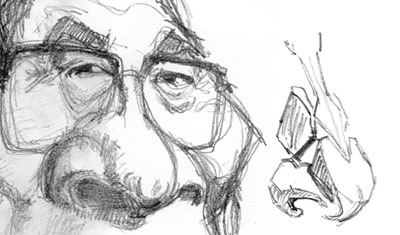
Now that's a lot of information I just threw at you. But when you look at this next picture, can you now see the different divisions of the nose - both in terms of the three wedges and in terms of the cartilage underneath? Can you "see" the cartilages in this next picture?
Can you imagine you see the different cartilages beneath the surface of the nose here?
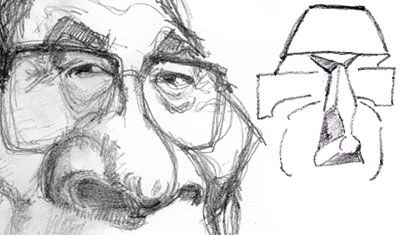
Now compare that to this next picture where you get to "see" and pick out the the three different wedges of the nose:
Can you see the different wedge shapes within the nose? Compare those to the "cartilages"
in the picture above. Note also how dominating the tip of the nose is -- especially when
compared to the minuscule middle wedge. Don't forget about the first wedge up there
between the eyes - it's kind of hid behind the glasses.
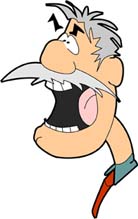
If you compare the noses in the next two pictures - one a cartoon, one a caricature - see if you can't spot (or imagine) the different wedges of the nose. Also see if you can't identify the proportion each wedge or section of each nose contributes to the overall size of the nose:
Compare these two noses: how are the two noses represented? Or asked differently,
how much "nose" in the cartoon is conveyed with just a minimum of lines? And can
you identify the different parts of the nose - especially can you differentiate the
nostrils from bulbous tip? (It's especially subtle in the cartoon guy.)
Moving on
OK, that was pretty in-depth. Much more info than you need to know to get started drawing noses, but it will help you recognize a good deal more when observing the nose - especially now that you have an inkling of what's there beyond the surface.
Shades of gray and transition
If there's something hard to draw about the nose, it's how to make it look like it's attached to the face - without making it look like it's just floating there in space.
The nose can be drawn in minimalist lines or with a great amount of detail like you see in the Thelonius Monk picture above or this Pete Townsend picture here to the right.
Squint your eyes and see if you can't make all the apparent detail collapse into more identifiable and therefore more manageable and drawable shadow shapes.
Note the different tones and grades (or shades) of shadows that coalesce when you do that.
Obstacles that arise when drawing the nose
There are, I think, several troublesome obstacles you confront when drawing noses:
First, making them transition smoothly into the face is number one (at least in highly detailed, realistic drawings or caricatures) and,
Second, the subtle shadowing - which really makes the nose stand out from the rest of the face. (I know, seems like the same thing as the transitions problem, but they are different if you think about it.) And...
Thirdly, making it look like it's coming straight out - that it's not crooked
To resolve number one, shadows, not lines make that transition real. Resolving number the second and third obstacles: heightening your observational skills, learning to differentiate shades and tones of intensity between those shadows, reckoning perspective and proportion. These are the keys to really mastering the rest. I know that's a pretty tall order (but not really - you can learn all that in lessons one through nine of the YouCanDraw.com e-book.) For now, learning to recognize the major areas of shadow will be a great first step.
The major shadow areas of the nose
From most obvious to the more subtle, here's a list of the nose's major shadow areas:
Strongest shadows (usually) the shadows under and especially within the nostrils;
the next darkest shadows are usually in the area where the nose casts it's shadow over the "apron of the upper lip" - which is the area directly between the nose and upper lip. Generally it's a cast shadow.
There's also a subtle but often strong shadow between the nostrils and the cheeks (at the origin of the "naso-labial fold"), which redundantly, is right there where the side of each nostril meets the cheek;
there's also subtler shadows between the different caritlages (most notably between the greater and lesser alar cartilages) and...
the king of subtle shadows: at the very tip of the nose. At this anatomic point, light is reflected from the apron of the upper lip - which lies beneath the nose - on up to the underside and tip of the nose. (Assignment: go find these shadows in all the pictures on this page - see if this isn't true.)
Lastly, look for areas of highlight - where light jumps most directly off the different surfaces of the nose. And with so many complicated surfaces on the nose, there's more than one highlight. (Clue: look where there's no shadowing :-)
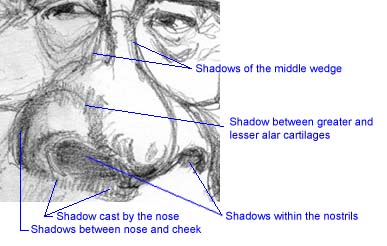
Here's the major shadow areas of the nose: at the sides of the nose, between the different
cartilages, within the nostrils and of course the shadow the nose casts over the upper
lip (Yes they can be broken down further into different levels of reflected light as well for instance like right at the very tip of the tip of the nose, but I won't overload you
with that right now)
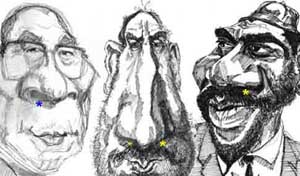
Also noteworthy: the main shadows of the nose are cast under it and on the side opposite the light source (i.e., if the light is coming from the right, this shadow is cast under the left nostril) - I'll point out these shadows with a star here:
Pointing out the strongest cast shadows of the nose. How to do this?
Ask yourself which direction is the light coming from. In the above
pictures, remember, the shadows will tell you!
Final notes on nostrils
Note the shape of the shadows within the nostrils - remember to squint. And as you squint note how the shapes become more decipherable. Also note how much nostril you see. For instance, look at Thelonius' nostrils compared to the Dali lama above. Look how turned up the Dali Lama's nostrils are.
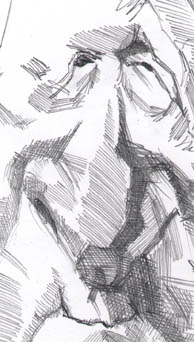
One last high-detail drawing. Can you identify the different shadows here? How about highlights? Can you find the main cast shadow of the nose? (it's coursing off to the right side of the picture under the nostril on the right and all the way down over the upper lip). Now ask yourself this: "where's the light source?"
Crosshatched in high detail - can you identify
the parts of the nose? How about the main
shadows? And lastly, from which
direction is the light coming?
Rehearsing what you've learned
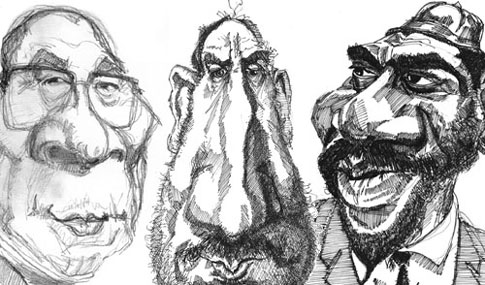
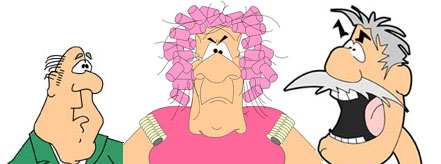
In this next picture - composed of three caricatures - I want you to compare the noses. Go down your list of freshly learned "features of the nose" list and identify them in each of the following pictures.
Quiz yourself about:
The three wedges (you remember - the first at the base of the forehead where the nose comes out, the middle or second wedge, the third wedge - which is in fact the third wedge)
Can you identify the different cartilages of each section of the nose? (I know I said you didn't have to memorize it, but going through this one more time will help to really drill it in to your memory if you review it. Like right now :-)
Can you identify the major areas of shadowing and highlight?
Now go through each of the three sections of the nose on each and with the tip of a sharp pen or pencil outline the actual drawn lines and outlines of each shape of the nose (as if you were tracing them) right on your computer screen.
[If the area you're tracing is a shadow shape, make a motion with your hand as if you were painting those shadow areas. This keeps your mind juggling both the outline of the shape with the concept that there is an overall shape there too.]
Lastly, compare the shape of the nostrils; especially note how much shadow beneath the nostril you actually see. The Dali Lama (over there on the left), has very visible nostrils whereas those of Mr. Townsend and Mr. Monk are pretty much out of sight:
Make your way around this picture and study the different shapes, shadows, highlights and anatomy of each caricature's nose. Go for it!
Simplifying
OK. Enough of the high falutin' stuff. Let's take a look at some cartoon approaches. What's great about these? Cartoons reduce all the rigamaro you saw above to manageable, easily drawable "reductions" (meaning they've been reduced to a minimal amount of information - to lines that still convey what the mind can easily interpret as a nose.)
Look at how well the idea of "nose" is conveyed with very little line or detail
in each of these cartoon style pictures
Like you just did with the more complicated pictures, zoom in on each cartoon nose. Note how with a minimum of lines your brain gets the message: it's a nose. Try to identify the three wedges within each (if you can only see one or two, ask which: bulbous tip, middle or upper wedge at the root of the nose (where it comes out of the forehead).
Here's a few more of cartoon characters - focus on the use of lines. Focus especially on the treatment of the noses:
Take 5!
Before you get down to do your very own nose drawings, take yourself a five minute break and check out these different approaches by well known artists:
Check out these Nixon "cartoons":
(you may have to scroll down the page to find President Nixon - or faster yet, type "Richard Nixon" in the search box at the top right of the page when you get there). Compare them to these amazingly detailed and in-depth caricature of David Levine's
. Compare the use of line and crosshatching as well as the overall likeness of the drawings.
Your turn to draw
Ok! You've had a pretty good exposure to noses. You've had an opportunity to look at a whole gang of 'em. You've seen a goodly chunk of the nose's anatomy and different ways to visually group the different parts of the nose. To really complete your exposure here today, actually taking a stab at drawing some noses will help cement what you've learned today. So like the other pages at this site you always get a chance to get in some actual drawing practice. No exception here. You get to draw these cartoonified noses first:
Go for it! Click on the button below to print out your practice drawing page of noses
And you get to draw them in a grid like you've done before. Nothing new here :-) (See how things are starting to get repetitious? Same approaches, just different subjects? That's because there's only five skills you have to learn to learn to draw!) After you draw these, then you get to draw some higher detail drawings.
Click here for a pre-gridded picture of noses and the empty grid you get to draw them in:
Note: If a new screen doesn't open on your computer monitor, click on the last Internet Explorer or Netscape mini-icon on the right at the very bottom of your computer screen. This should pop the new browser back up to the top. If that doesn't work, click on all of the browser icons one at a time along the bottom of your screen until you see the correct picture pop up. And you'll know which one that is. Go right down the row and click on these:
Click here for a Pete Townsend nose and an empty grid you get to draw it in:
Click here for a Thelonius Monk nose and an empty grid you get to draw it in:
Now go for it!
And of you're liking these lessons, make sure you visit the YouCanDraw.com homepage where you'll find arguably the largest book ever written on drawing - it shows you how to draw faces and caricatures in 15 steps - even if you've never drawn before.
Like these lessons? If you'd like all sorts of rehearsal and even more practice at drawing noses (and just about everything else about drawing faces), and have all sorts of fun doing it, check out this e-book - the most complete guide to drawing faces and caricatures even if you've never drawn before - at www.YouCanDraw.com