|
Lesson 2: Face-Vase Number 2 - Ugly Faces
|
The first step in drawing: getting out of your mind, more accurately, getting out of your thinking, naming, language bound linear brain - and time to start recognizing the amazing capabilities of your right brain
Hopefully you've completed lesson one. (If not I urge you to go back and do it right now! Buckminster Fuller had an analogy he liked to use for learning. Learning is like pole-vaulting: the higher you want to go, the farther back you start - but you cover the same ground on every new attempt. Bit by bit, you get where you want to go.)
What we're trying you accomplish: Getting access to the visual, spatial R-mode, and training ourselves to access it at will. In this lesson, you'll be going a step deeper into seeing as an artist sees. Before you start drawing, please read the lesson through beginning to end. (The instructions to this are fairly short.)
Step 1
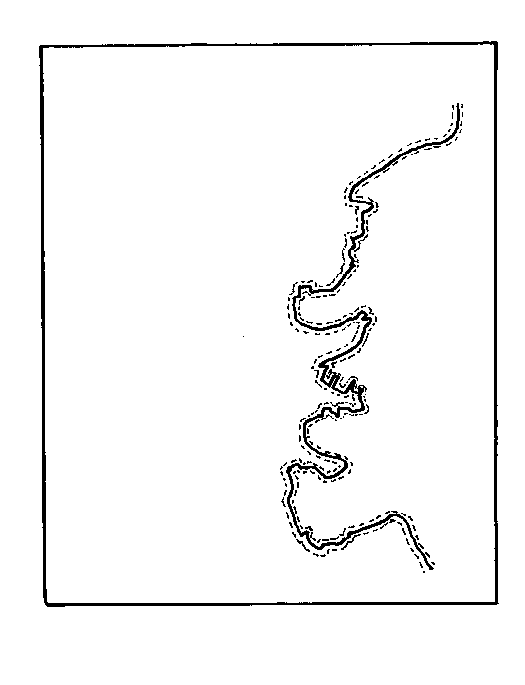
Like lesson number one, draw a profile of a face. If you're right-handed draw on the left side of the paper (nose in the middle), If you're left-handed draw it on the right, nose in the middle. Except this time, draw the ugliest, bizarrest, wartiest, most deformed face you can conjure up. (See illustration just below.)
This exercise is exactly the same as Lesson one with one difference: here you're trying to draw a face so ugly, so deformed that you've got to work at it to still see a face in it. See the animation from lesson I to reacquaint yourself with the general idea. Click for overview of Lesson I Animation

Draw the ugliest face profile you can conjure up
download or print these examples)
Again draw from any pictures that might pop up in your head. Most of the time what you'll come up with is "stored" images of the left brain, compiled references. And that's just fine for what we're doing here. . pop
Step 2
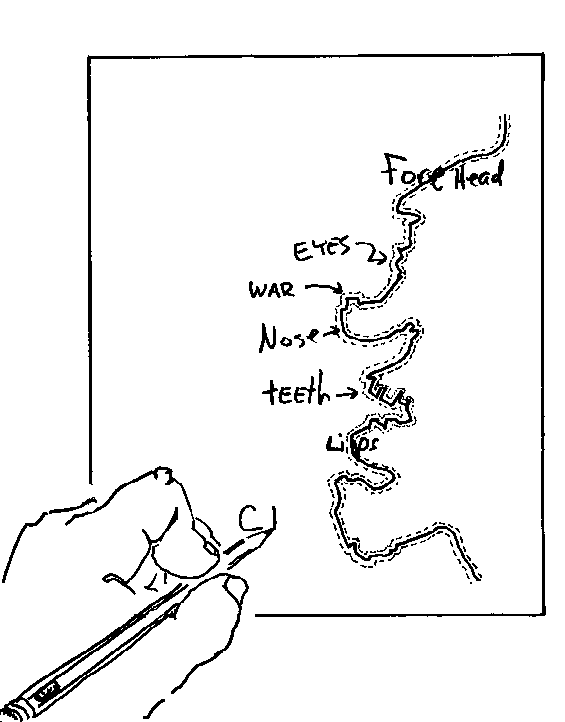
Like lesson number one, take your pencil and trace over what you've drawn naming all the parts as you go. ("forehead, lump on forehead, nose, wart, big mole on nose, swollen lip, pointy chin...etc.) Just make sure you name all the features and the odd parts as you go like the illustration:

Trace over the profile you've drawn and name the parts (You
don't need to write them on the paper like this illustration
suggests, but do repeat their names out loud
as you trace them)
The reason you name the parts again is this: it activates you Left-mode, your language-centered, linear, rational, dominant, symbol-oriented left hemisphere. (I'll keep repeating this to remind you, the goal of these exercises is to recognize when you're accessing each of the different information processing sides of your brain.)
Step 3
Add the horizontal lines to the top and bottom of our drawing. (Remember, these will be the top and bottom of the vase. see Lesson 1 step 2 if necessary. Look in yellow box under illustration for return link to here.)
Step 4
As in lesson number one, the first profile you drew on the paper was done in L-mode: it came from stored symbols you've packed away in your brain under the file "monsters", and "ugly", Halloween, witches, etc. The second step of naming the pictures, reinforced the L-mode attention you gave your drawing.
In this step, you're going to draw the other half of the vase - the reverse profile of the first face, warts and all. Whether you used the printed version, figure or drew your own, the more complicated the picture, the more you'll be trying to duplicate something you've never seen before. And that's perfect for what we're doing because the left brain doesn't like this kind of complication. It prefers the easy, "pat-answer" approach.
Allowing the Right Brain to step in...
So in order to complete this drawing, you're left brain will have to step aside and let the right hemisphere do what it was created to do. In fact, an image this complex can probably only be done in R-mode. Completing the vase will literally push you into R-mode.
So, start at the top, move your way down bit by bit, comparing each line, and curve, observing where it's coming from and where it's going. Scan back and forth. If you must ask questions, start training yourself to ask questions like: "how does this line curve compared to that one?", "does this angle towards or away from the vertical or horizontal sides of the paper?", "how far is this curve from the other?"
All of these are comparative questions, relational questions, the kinds of questions R-mode is best suited to answer. When you're deep into R-mode, you'll feel no need to use words at all. Now go draw.
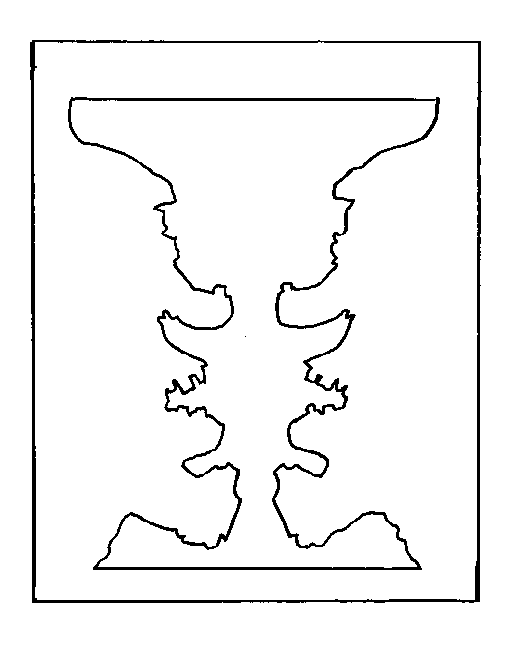
When finished it might look something like this:

The completed Monster Face/Vase
Again, the point of this...
As you you get deeper and deeper into R-mode with each successive exercise, you'll get more and more cognizant of the shift: of how it feels to be in the "right" hemisphere, the artist's frame of mind. So don't worry about how technically exact your picture is, just relax and learn to experience the shift. In time you'll be able to access this function at will - and the doors to your own creative mind will be opening.
| Homework: more exercises - from skill level easier to more difficult. Some pictures will come close to touching and even overlap - this is fine and means you're really paying attention. This is an example of how funky face 9 will look when completed. Most of the faces can printed in reverse for left and right handed drawers. Try and do both versions to really stretch yourself. The goal is to start making that switch into R-mode. (Some of these monster/funky faces get pretty far out. Have fun with them an do not worry about anything looking "right"! There is no way to do this assignment wrong.)
|
For more reinforcement, see this page: February 28th, 2003
Go to lesson 3
Kasbohm & Company's
YouCanDraw.com /
and
Drawing-faces-and-caricatures-made-easy.com
© Copyright, All rights reserved 1997-2006
|